WordPress with Kubernetes
This page shows you how to deploy a sample WordPress site using GKE Sandbox.
Before you begin
Take the following steps to enable the Kubernetes Engine API:
- Visit the Kubernetes Engine page in the Google Cloud Platform Console.
- Create or select a project.
Creating a node pool with gVisor enabled
Create a node pool inside your cluster with option --sandbox type=gvisor added
to the command, like below:
gcloud container node-pools create gvisor --cluster=${CLUSTER_NAME?} --sandbox type=gvisor --machine-type=e2-standard-2
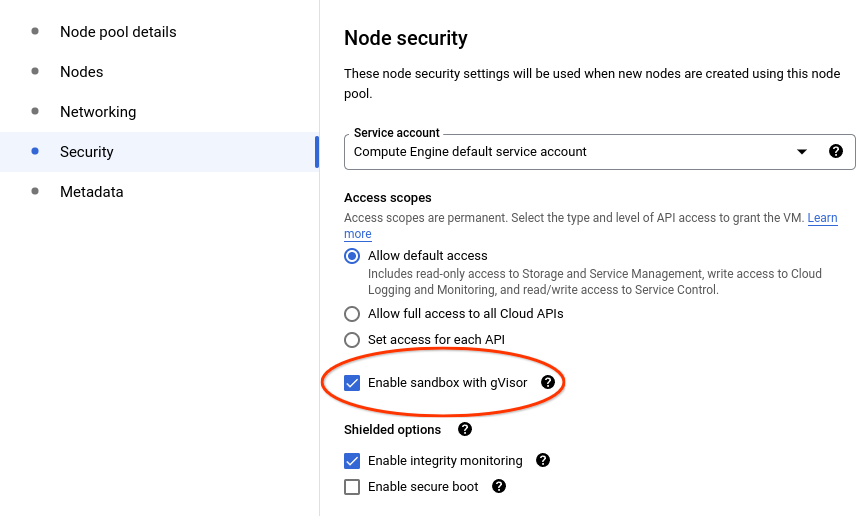
If you prefer to use the console, select your cluster and select the ADD NODE POOL button:

Then click on the Security tab on the left and select Enable sandbox with gVisor option. Select other options as you like:
Check that gVisor is enabled
The gvisor RuntimeClass is instantiated during node creation. You can check
for the existence of the gvisor RuntimeClass using the following command:
$ kubectl get runtimeclass/gvisor
NAME     HANDLER   AGE
gvisor   gvisor    1h
Wordpress deployment
Now, let’s deploy a WordPress site using GKE Sandbox. WordPress site requires
two pods: web server in the frontend, MySQL database in the backend. Both
applications use PersistentVolumes to store the site data. In addition, they
use secret store to share MySQL password between them.
Note: This example uses gVisor to sandbox the frontend web server, but not the MySQL database backend. In a production setup, due to the I/O overhead imposed by gVisor, it is not recommended to run your database in a sandbox. The frontend is the critical component with the largest outside attack surface, where gVisor’s security/performance trade-off makes the most sense. See the Production guide for more details.
First, let’s download the deployment configuration files to add the runtime class annotation to them:
curl -LO https://k8s.io/examples/application/wordpress/wordpress-deployment.yaml
curl -LO https://k8s.io/examples/application/wordpress/mysql-deployment.yaml
Add a spec.template.spec.runtimeClassName set to gvisor to both files, as shown below:
wordpress-deployment.yaml:
apiVersion: v1
kind: Service
metadata:
  name: wordpress
  labels:
    app: wordpress
spec:
  ports:
    - port: 80
  selector:
    app: wordpress
    tier: frontend
  type: LoadBalancer
---
apiVersion: v1
kind: PersistentVolumeClaim
metadata:
  name: wp-pv-claim
  labels:
    app: wordpress
spec:
  accessModes:
    - ReadWriteOnce
  resources:
    requests:
      storage: 20Gi
---
apiVersion: apps/v1
kind: Deployment
metadata:
  name: wordpress
  labels:
    app: wordpress
spec:
  selector:
    matchLabels:
      app: wordpress
      tier: frontend
  strategy:
    type: Recreate
  template:
    metadata:
      labels:
        app: wordpress
        tier: frontend
    spec:
      runtimeClassName: gvisor   # ADD THIS LINE
      containers:
      - image: wordpress:4.8-apache
        name: wordpress
        env:
        - name: WORDPRESS_DB_HOST
          value: wordpress-mysql
        - name: WORDPRESS_DB_PASSWORD
          valueFrom:
            secretKeyRef:
              name: mysql-pass
              key: password
        ports:
        - containerPort: 80
          name: wordpress
        volumeMounts:
        - name: wordpress-persistent-storage
          mountPath: /var/www/html
      volumes:
      - name: wordpress-persistent-storage
        persistentVolumeClaim:
          claimName: wp-pv-claim
mysql-deployment.yaml:
apiVersion: v1
kind: Service
metadata:
  name: wordpress-mysql
  labels:
    app: wordpress
spec:
  ports:
    - port: 3306
  selector:
    app: wordpress
    tier: mysql
  clusterIP: None
---
apiVersion: v1
kind: PersistentVolumeClaim
metadata:
  name: mysql-pv-claim
  labels:
    app: wordpress
spec:
  accessModes:
    - ReadWriteOnce
  resources:
    requests:
      storage: 20Gi
---
apiVersion: apps/v1
kind: Deployment
metadata:
  name: wordpress-mysql
  labels:
    app: wordpress
spec:
  selector:
    matchLabels:
      app: wordpress
      tier: mysql
  strategy:
    type: Recreate
  template:
    metadata:
      labels:
        app: wordpress
        tier: mysql
    spec:
      #runtimeClassName: gvisor  # Uncomment this line if you want to sandbox the database.
      containers:
      - image: mysql:5.6
        name: mysql
        env:
        - name: MYSQL_ROOT_PASSWORD
          valueFrom:
            secretKeyRef:
              name: mysql-pass
              key: password
        ports:
        - containerPort: 3306
          name: mysql
        volumeMounts:
        - name: mysql-persistent-storage
          mountPath: /var/lib/mysql
      volumes:
      - name: mysql-persistent-storage
        persistentVolumeClaim:
          claimName: mysql-pv-claim
Note that apart from runtimeClassName: gvisor, nothing else about the
Deployment has is changed.
You are now ready to deploy the entire application. Just create a secret to store MySQL’s password and apply both deployments:
$ kubectl create secret generic mysql-pass --from-literal=password=${YOUR_SECRET_PASSWORD_HERE?}
$ kubectl apply -f mysql-deployment.yaml
$ kubectl apply -f wordpress-deployment.yaml
Wait for the deployments to be ready and an external IP to be assigned to the Wordpress service:
$ watch kubectl get service wordpress
NAME        TYPE           CLUSTER-IP     EXTERNAL-IP      PORT(S)        AGE
wordpress   LoadBalancer   10.120.16.63   35.203.179.216   80:31025/TCP   1m
Now, copy the service’s EXTERNAL-IP from above to your favorite browser to
view and configure your new WordPress site.
Congratulations! You have just deployed a WordPress site using GKE Sandbox.
What’s next
To learn more about GKE Sandbox and how to run your deployment securely, take a look at the documentation.
Before taking this deployment to production, review the Production guide.