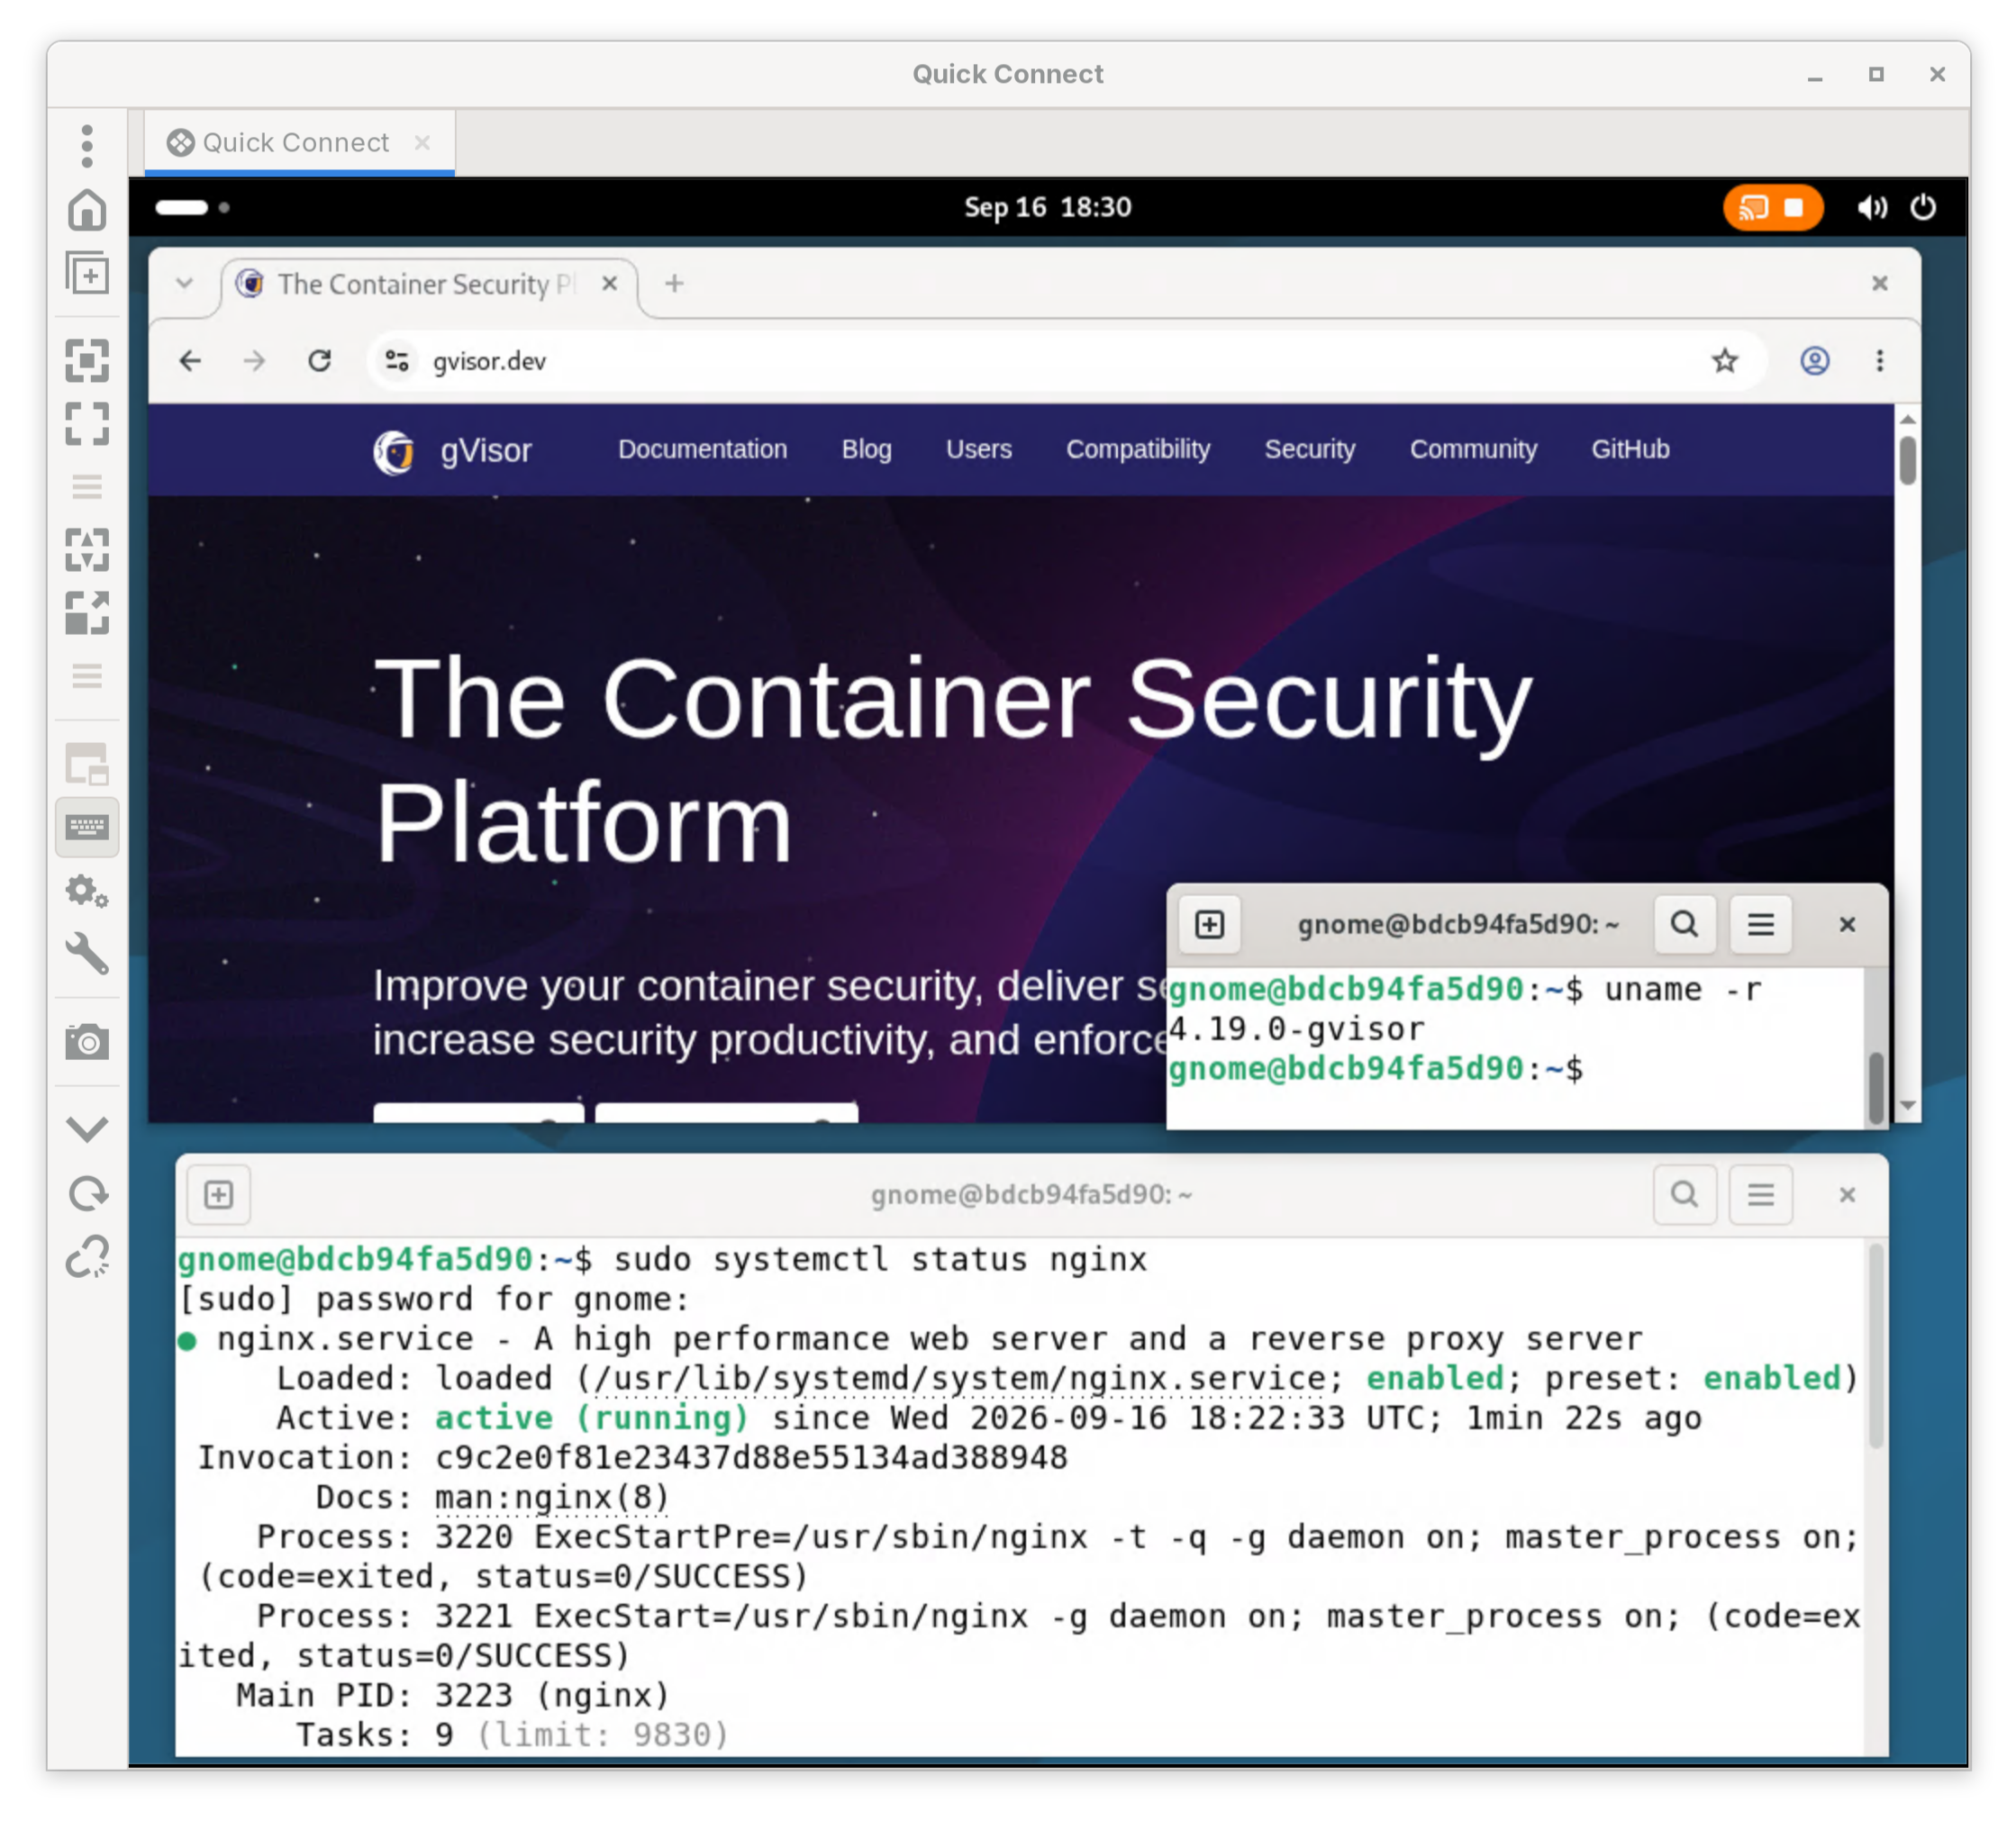
As an OCI runtime, gVisor is traditionally used to sandbox application containers containing a single service. These containers have little to no userspace running in them except the service itself. While this is great for efficiency and scalability, there are some use cases that can benefit from having something closer to a full Linux system inside the sandbox, with a “normal” service manager and system daemons.
gVisor now has gained support for running systemd. To this end, support for a handful of major new kernel APIs has been added to gVisor, including:
- The new mount API,
- Cgroups v2,
- Pidfds,
- POSIX ACL support for
tmpfsandoverlayfs, - The
openat2(2)system call,
along with numerous smaller features and bug fixes.
Systemd has been tested to work in full-system gVisor containers with Ubuntu, Debian, and Red Hat’s Universal Base Images.
This opens up some interesting new use cases.
Sandboxed developer workstation
The Docker image in the gVisor repository’s images/systemd-user/systemd-ubuntu
sets up a full-system Ubuntu container, configured to boot with systemd.
To run it, first add the following flags to the runsc runtime in
/etc/docker/daemon.json. As an example:
{
    "runtimes": {
        "runsc": {
            "path": "/usr/local/bin/runsc",
            "runtimeArgs": [
                "--in-sandbox-cgroup=v2",
                "--allow-suid"
            ]
        }
    }
}
Next, build and run the container:
# Clone the gVisor repository
$ git clone https://github.com/google/gvisor.git
$ cd gvisor

# Build & run the systemd-ubuntu container in gVisor
$ docker build -t systemd-ubuntu images/systemd-user/systemd-ubuntu
$ docker run --runtime=runsc --tmpfs /run --tmpfs /home:exec --privileged -d --name dev --hostname dev -p 127.0.0.1:2222:22 systemd-ubuntu
It is important to note that when used with gVisor, --privileged does not
give any extra host privilege to the application running in the sandbox; gVisor
simulates the extra privileges (such as capabilities) that are observed by the
sandboxed application.
Inside the container:
$ docker exec -it dev bash
root@dev:/# uname -r
4.19.0-gvisor
root@dev:/# head -4 /etc/os-release
PRETTY_NAME="Ubuntu 26.04 LTS"
NAME="Ubuntu"
VERSION_ID="26.04"
VERSION="26.04 LTS (Resolute Raccoon)"
root@dev:/# systemctl status
● dev
    State: running
    Units: 180 loaded (incl. loaded aliases)
     Jobs: 0 queued
   Failed: 0 units
    Since: Mon 2026-08-10 19:29:51 UTC; 5s ago
  systemd: 259.5-0ubuntu3.3
  Tainted: unmerged-bin:old-kernel
   CGroup: /
           ├─init.scope
           │ ├─ 1 /sbin/init
           │ ├─46 bash
           │ ├─48 systemctl status
           │ └─49 "(pager)"
           └─system.slice
             ├─dbus.service
             │ └─43 @dbus-daemon --system --address=systemd: --nofork --nopidfile --systemd-activation --syslog-only
             ├─systemd-journald.service
             │ └─18 /usr/lib/systemd/systemd-journald
             └─systemd-logind.service
               └─44 /usr/lib/systemd/systemd-logind
systemd is running normally in gVisor, with a full-system Ubuntu container. As
a first service, let’s try installing OpenSSH and creating a user:
root@dev:/# apt update && apt install -y openssh-server
root@dev:/# systemctl enable --now sshd
root@dev:/# useradd --create-home --shell $SHELL chert
root@dev:/# echo ember | passwd chert --stdin
root@dev:/# gpasswd -a chert sudo
root@dev:/# exit
Now on the host we can ssh into the container as if it were a normal Linux VM:
$ ssh -p 2222 chert@127.0.0.1
Are you sure you want to continue connecting (yes/no/[fingerprint])? yes
Warning: Permanently added '[127.0.0.1]:2222' (ED25519) to the list of known hosts.
chert@127.0.0.1's password:
Last login: Mon Aug 10 19:40:46 2026 from 172.17.0.1
chert@dev:~$
This is useful, for example, as a full-system development container when the code being worked on or its dependencies are untrusted, perhaps as part of a CI/CD pipeline.
Let’s try building CUPS, a printing server for Unix-like systems, in our new development container. First, let’s clone the source code and install build dependencies:
chert@dev:~$ sudo apt install -y autoconf build-essential \
     avahi-daemon libavahi-client-dev \
     libssl-dev libkrb5-dev libnss-mdns libpam-dev \
     libsystemd-dev libusb-1.0-0-dev zlib1g-dev unzip
chert@dev:~$ wget 'https://github.com/OpenPrinting/cups/releases/download/v2.4.19/cups-2.4.19-source.tar.gz'
chert@dev:~$ tar xvf cups-2.4.19-source.tar.gz
chert@dev:~$ cd cups-2.4.19/
chert@dev:~/cups-2.4.19$ ./configure --with-systemd=/lib/systemd/system --libdir=/usr/lib/x86_64-linux-gnu
chert@dev:~/cups-2.4.19$ make -j$(nproc)
chert@dev:~/cups-2.4.19$ sudo make install
Notice that the systemd unit files have been installed:
chert@dev:~/cups-2.4.19$ sudo systemctl list-unit-files | grep cups
cups.path                                    enabled         enabled
cups-lpd@.service                            static          -
cups.service                                 enabled         enabled
system-cups.slice                            static          -
cups-lpd.socket                              disabled        enabled
cups.socket                                  enabled         enabled
chert@dev:~/cups-2.4.19$
And we can enable and start the CUPS service directly, as with a normal Linux VM:
chert@dev:~/cups-2.4.19$ sudo systemctl enable --now cups
Created symlink '/etc/systemd/system/printer.target.wants/cups.service' → '/usr/lib/systemd/system/cups.service'.
Created symlink '/etc/systemd/system/multi-user.target.wants/cups.service' → '/usr/lib/systemd/system/cups.service'.
Created symlink '/etc/systemd/system/sockets.target.wants/cups.socket' → '/usr/lib/systemd/system/cups.socket'.
Created symlink '/etc/systemd/system/multi-user.target.wants/cups.path' → '/usr/lib/systemd/system/cups.path'.
chert@dev:~/cups-2.4.19$ sudo systemctl status cups
● cups.service - CUPS Scheduler
     Loaded: loaded (/usr/lib/systemd/system/cups.service; enabled; preset: enabled)
     Active: active (running) since Thu 2026-09-03 18:39:47 UTC; 4h 17min ago
 Invocation: beac14c3deb245bb9db702ee186dfbc5
TriggeredBy: ○ cups.path
             ● cups.socket
       Docs: man:cupsd(8)
   Main PID: 16097 (cupsd)
     Status: "Scheduler is running..."
      Tasks: 1 (limit: 9830)
     Memory: 2.3M
     CGroup: /system.slice/system-cups.slice/cups.service
             └─16097 /usr/sbin/cupsd -l

Sep 03 18:39:47 dev systemd[1]: Starting cups.service - CUPS Scheduler...
Sep 03 18:39:47 dev systemd[1]: Started cups.service - CUPS Scheduler.
GNOME in gVisor
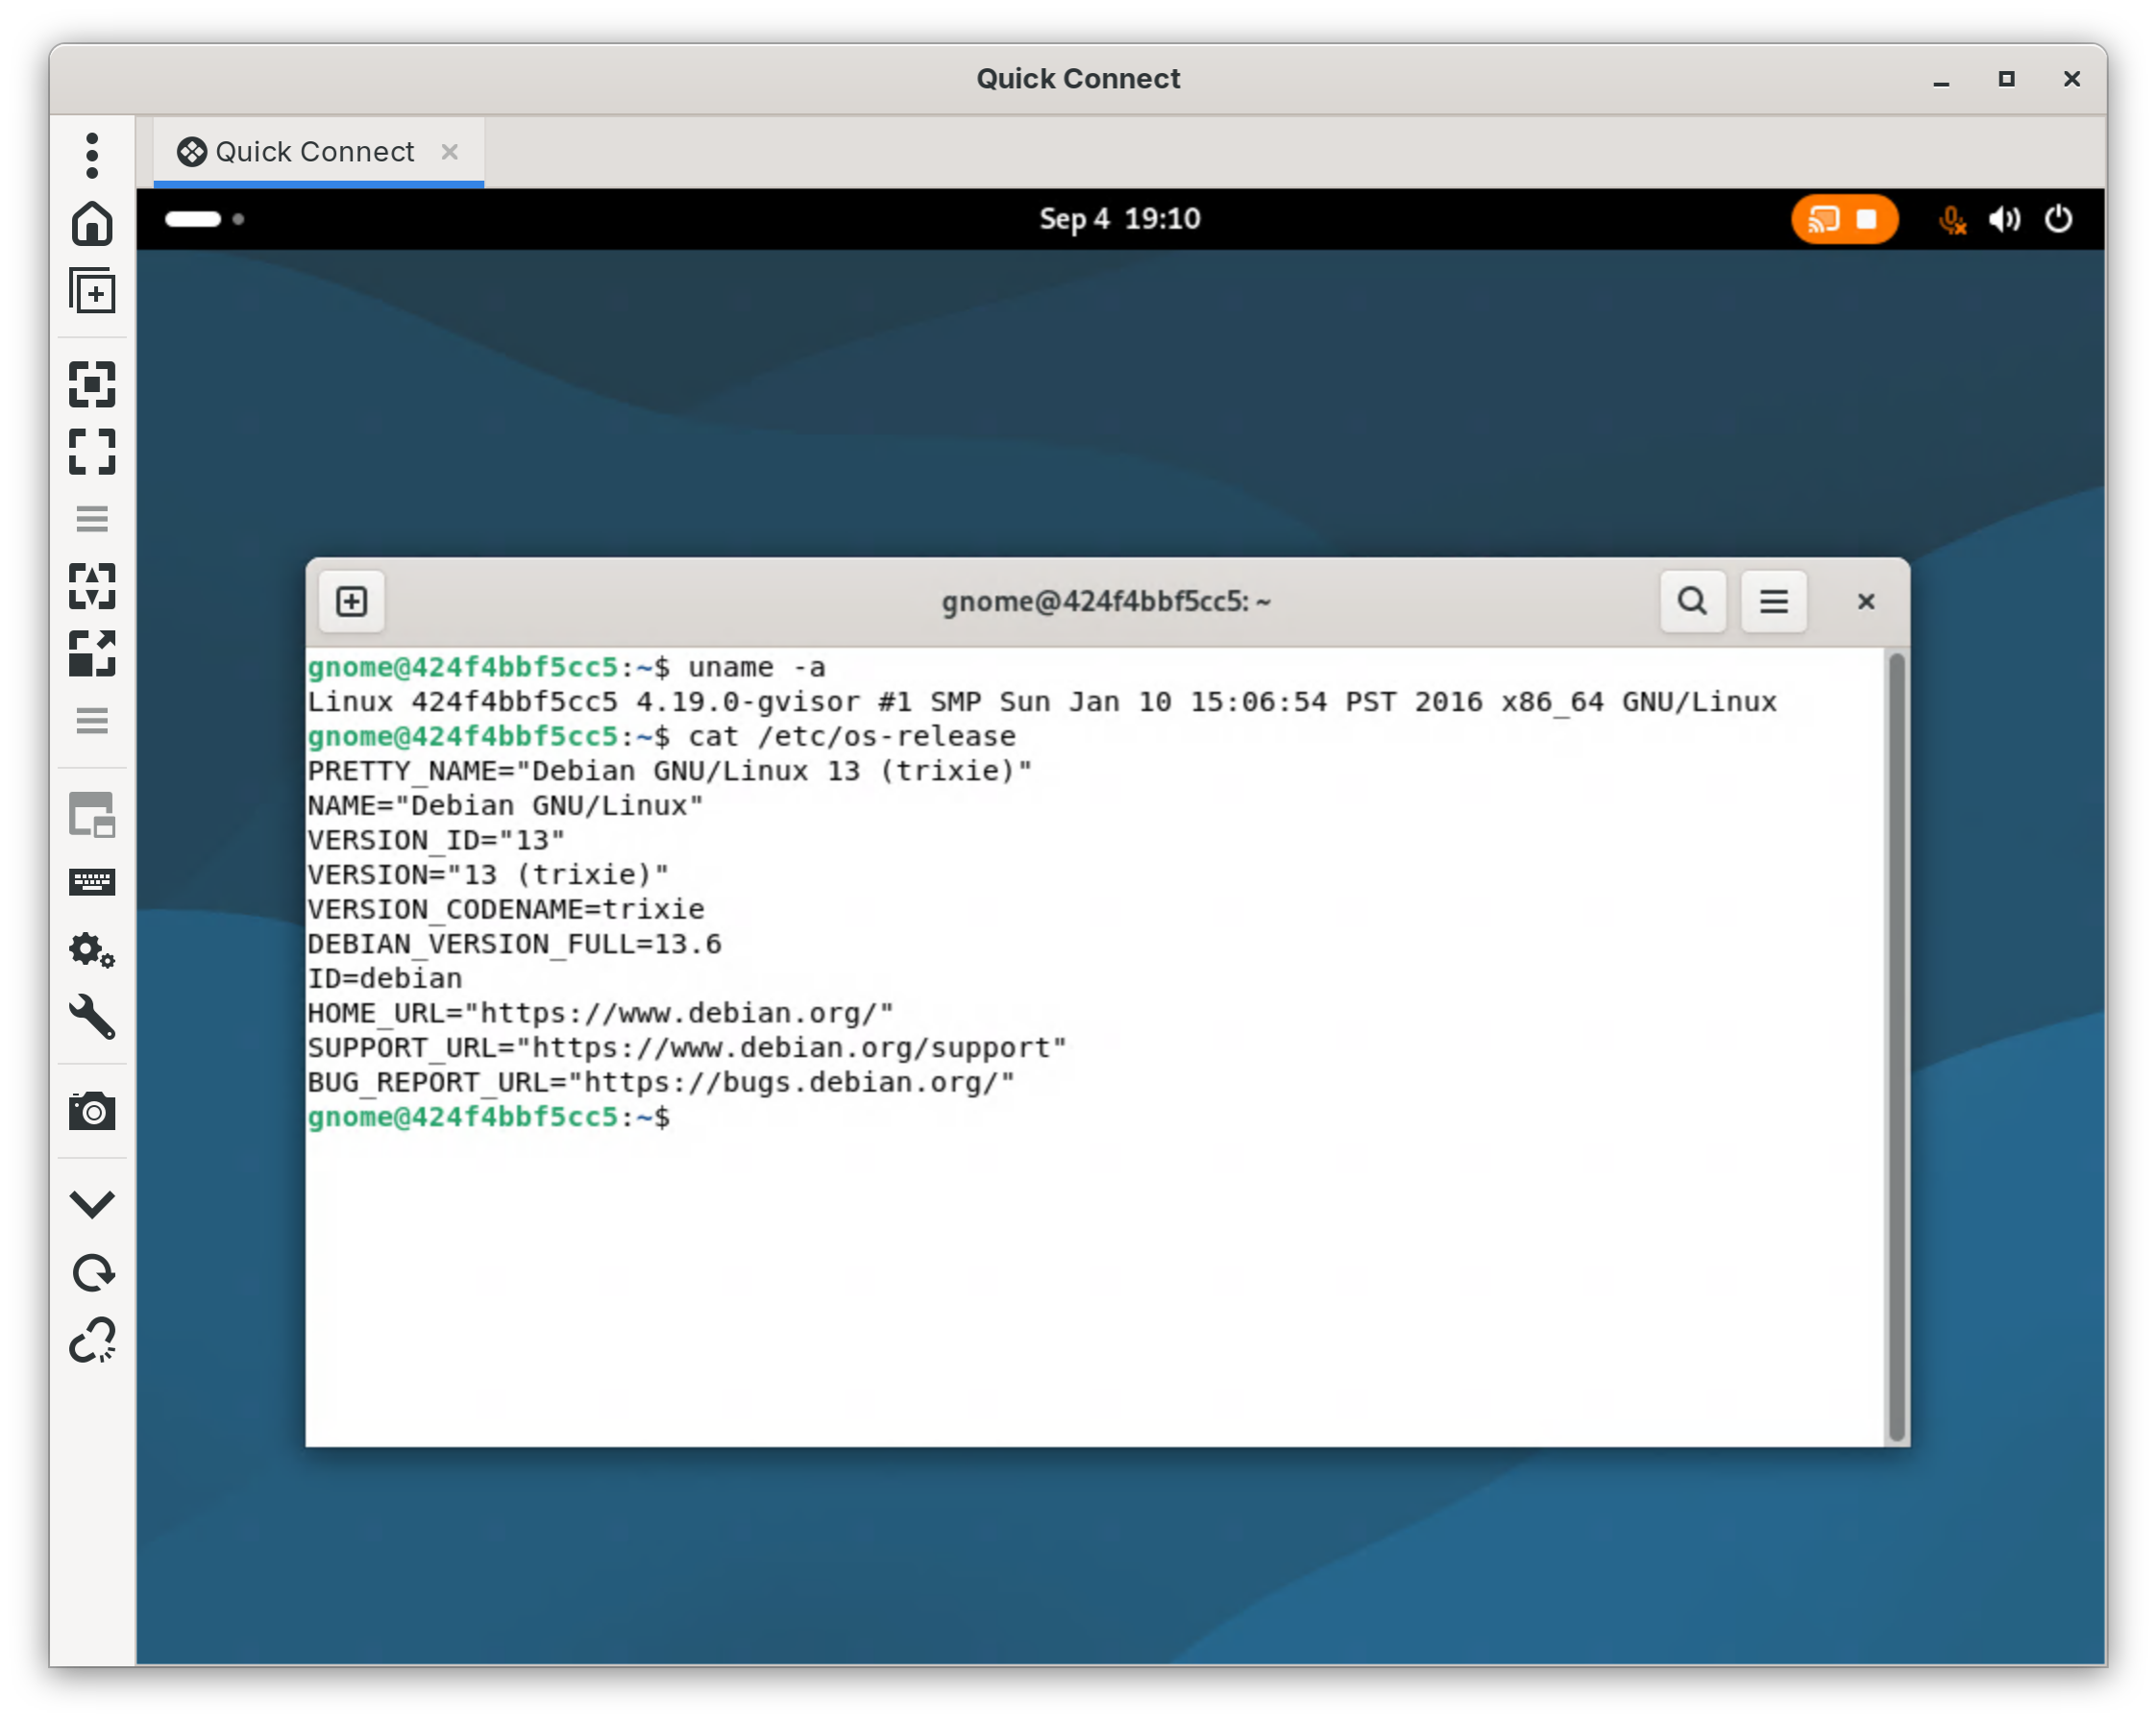
We’re not just limited to using the command-line in our sandboxed developer workstation, though. While hosting a full-system container, gVisor can now run a full sandboxed desktop environment. To showcase this, let’s set up a gVisor container with the popular GNOME desktop environment.
The gVisor repository contains the Docker image
images/systemd-user/systemd-debian-gnome for this purpose. In the gVisor
repository we cloned earlier:
# Build & run the systemd-debian-gnome container in gVisor
$ docker build -t systemd-debian-gnome \
      -f images/systemd-user/systemd-debian-gnome/Dockerfile.x86_64 \
      images/systemd-user/systemd-debian-gnome
$ docker run -d --name gnome --runtime=runsc --shm-size=1g --privileged -p 127.0.0.1:3389:3389 systemd-debian-gnome
The sandboxed GNOME workstation is exposed through RDP on port 3389, which can
be accessed using an RDP client such as Remmina by
connecting to 127.0.0.1:3389. The default username/password is gnome:gnome.
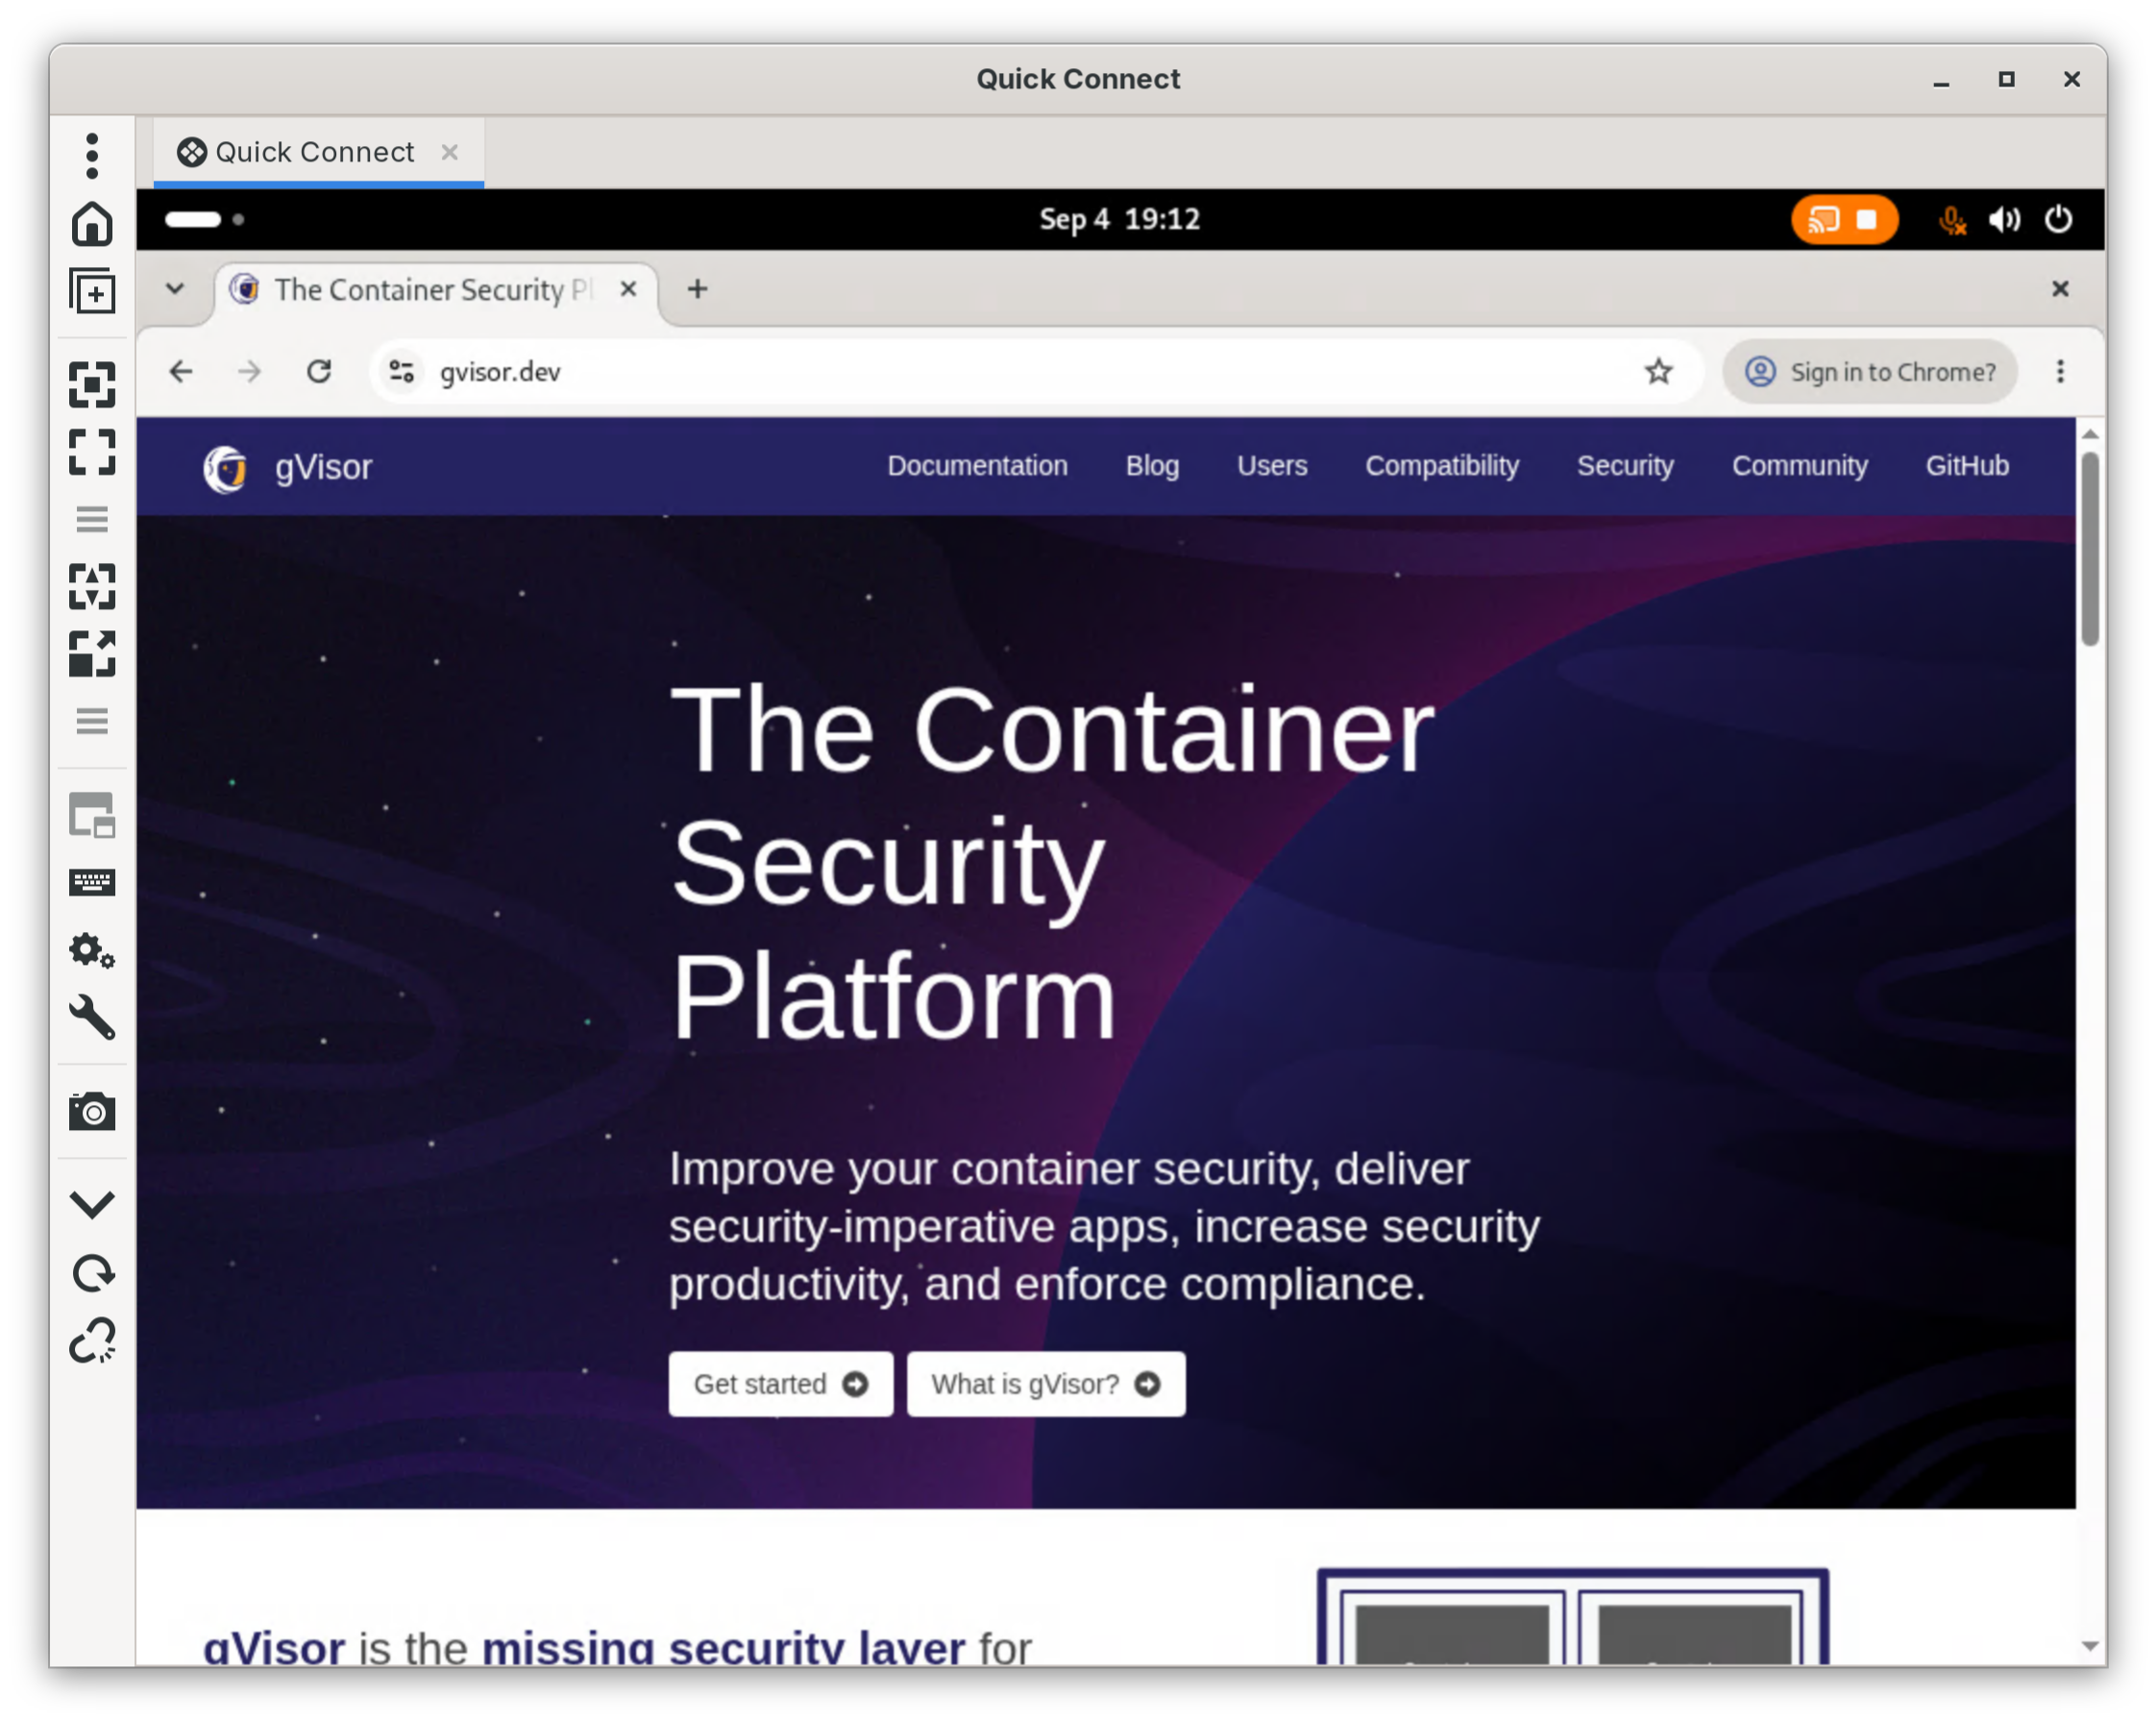
We can even browse the web in the sandbox:
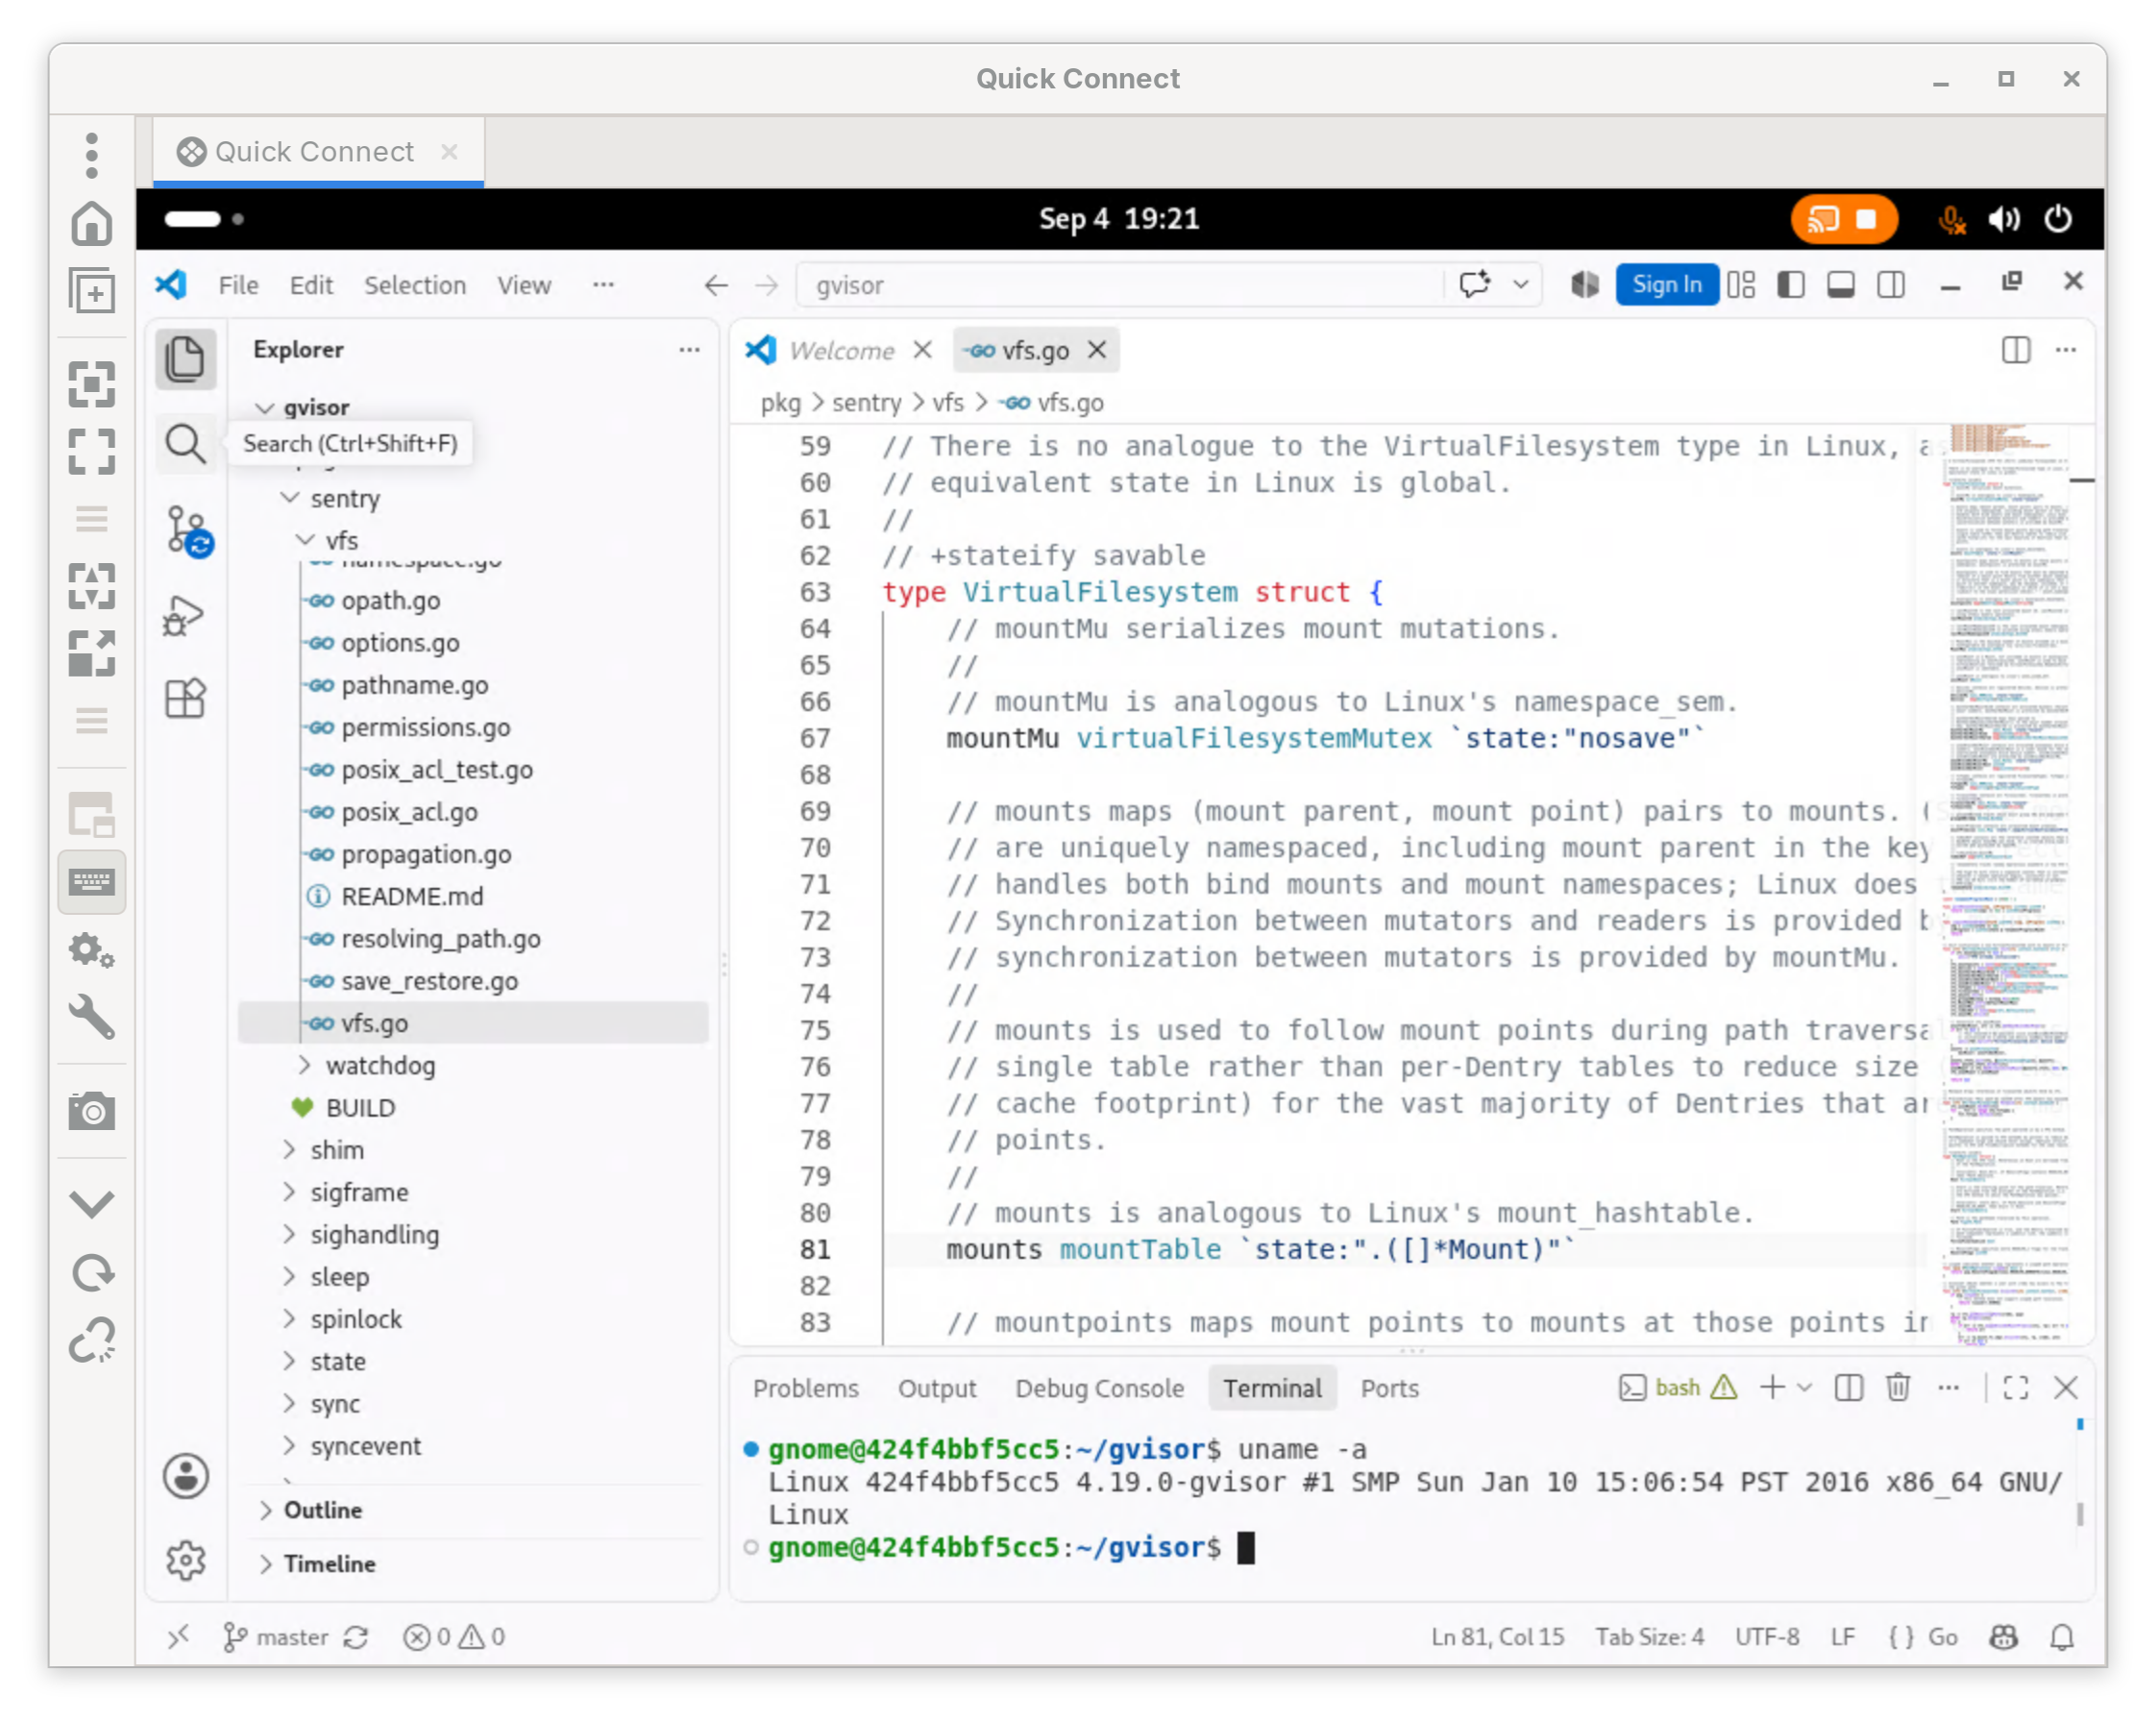
Or, to go full circle, we can develop gVisor inside of gVisor:
Other distributions
In addition to Debian-based distributions, RHEL-based images work too. For example:
$ docker run -d --runtime=runsc --privileged --name dev-rhel --hostname dev-rhel registry.access.redhat.com/ubi10/ubi-init
$ docker exec -it dev-rhel bash
[root@dev-rhel /]# uname -r
4.19.0-gvisor
[root@dev-rhel /]# head -2 /etc/os-release
NAME="Red Hat Enterprise Linux"
VERSION="10.2 (Coughlan)"
[root@dev-rhel /]# systemctl status
● dev-rhel
    State: running
    Units: 119 loaded (incl. loaded aliases)
     Jobs: 0 queued
   Failed: 0 units
    Since: Fri 2026-09-04 19:57:08 UTC; 7min ago
  systemd: 257-23.el10_2.2-g009f2a8
  Tainted: old-kernel
   CGroup: /
           ├─init.scope
           │ ├─ 1 /sbin/init
           │ ├─54 bash
           │ ├─68 systemctl status
           │ └─69 "(pager)"
           └─system.slice
             └─systemd-journald.service
               └─14 /usr/lib/systemd/systemd-journald
[root@dev-rhel /]#
Ansible
Ansible is a tool for provisioning and deploying software. Many Ansible roles expect a full Linux system, with a running service manager (like systemd). This presents a problem for testing, since CI pipelines can be difficult to keep secure, and native containers running systemd often require large amounts of privilege.
Full-system containers with gVisor sidestep this problem by allowing a VM-like container to be provisioned for each test run. Multiple gVisor containers can be run on a single host without sharing a kernel, making this setup much more secure.
To demonstrate, let’s do a test run of Jeff Geerling’s nginx role, which installs nginx and starts it as a systemd service, in gVisor.
Let’s continue in our dev container we created earlier:
$ ssh -p 2222 chert@127.0.0.1
chert@dev:~$ sudo apt install -y ansible git
...
chert@dev:~$ sudo git clone https://github.com/geerlingguy/ansible-role-nginx /etc/ansible/roles/geerlingguy.nginx
chert@dev:~$ cat > playbook.yml <<'EOF'
---
- name: Install nginx with geerlingguy.nginx
  hosts: all
  become: true

  pre_tasks:
    - name: Update apt cache.
      ansible.builtin.apt:
        update_cache: true
        cache_valid_time: 600
      changed_when: false

  roles:
    - role: geerlingguy.nginx
EOF
chert@dev:~$ sudo ansible-playbook -i localhost, -c local playbook.yml
Expand to see the Ansible playbook output.
PLAY [Install nginx with geerlingguy.nginx] **************************

TASK [Gathering Facts] ***********************************************
[WARNING]: Host 'localhost' is using the discovered Python interpreter at '/usr/bin/python3.14', but future installation of another Python interpreter could cause a different interpreter to be discovered. See https://docs.ansible.com/ansible-core/2.20/reference_appendices/interpreter_discovery.html for more information.
ok: [localhost]

TASK [Update apt cache.] *********************************************
ok: [localhost]

TASK [geerlingguy.nginx : Include OS-specific variables.] ************
ok: [localhost]

TASK [geerlingguy.nginx : Define nginx_user.] ************************
ok: [localhost]

TASK [geerlingguy.nginx : include_tasks] *****************************
skipping: [localhost]

TASK [geerlingguy.nginx : include_tasks] *****************************
included: /etc/ansible/roles/geerlingguy.nginx/tasks/setup-Ubuntu.yml for localhost
...
chert@dev:~$
Now that the playbook has run and installed nginx, observe that systemd is managing nginx just like on a normal Linux VM:
Expand to see the systemctl status nginx output.
systemctl status nginx output.chert@dev:~$ sudo systemctl status nginx
● nginx.service - A high performance web server and a reverse proxy server
Loaded: loaded (/usr/lib/systemd/system/nginx.service; enabled; preset: enabled)
Active: active (running) since Fri 2026-09-04 21:11:21 UTC; 1min 10s ago
Invocation: f42bafe5b01a412f8c8a961eec0cf957
Docs: man:nginx(8)
Process: 2397 ExecStartPre=/usr/sbin/nginx -t -q -g daemon on; master_process on; (code=exited, status=0/SUCCESS)
Process: 2398 ExecStart=/usr/sbin/nginx -g daemon on; master_process on; (code=exited, status=0/SUCCESS)
Process: 2437 ExecReload=/usr/sbin/nginx -g daemon on; master_process on; -s reload (code=exited, status=0/SUCCESS)
Main PID: 2400 (nginx)
Tasks: 9 (limit: 9830)
Memory: 24.5M
CGroup: /system.slice/nginx.service
├─2400 "nginx: master process /usr/sbin/nginx -g daemon on; master_process on;"
├─2439 "nginx: worker process"
├─2440 "nginx: worker process"
├─2441 "nginx: worker process"
├─2442 "nginx: worker process"
├─2443 "nginx: worker process"
├─2444 "nginx: worker process"
├─2445 "nginx: worker process"
└─2446 "nginx: worker process"
Sep 04 21:11:21 dev systemd[1]: Starting nginx.service - A high performance web server and a reverse proxy server...
Sep 04 21:11:21 dev systemd[1]: Started nginx.service - A high performance web server and a reverse proxy server.
Sep 04 21:11:23 dev systemd[1]: nginx.service: Failed to get CPU usage: No such file or directory
Sep 04 21:11:23 dev systemd[1]: Reloading nginx.service - A high performance web server and a reverse proxy server...
Sep 04 21:11:23 dev nginx[2437]: 2026/09/04 21:11:23 [notice] 2437#2437: signal process started
Sep 04 21:11:23 dev systemd[1]: Reloaded nginx.service - A high performance web server and a reverse proxy server.
Sep 04 21:12:32 dev systemd[1]: nginx.service: Failed to get CPU usage: No such file or directory
chert@dev:~$
And nginx responds to web traffic normally:
Expand to see the curl http://127.0.0.1 output.
curl http://127.0.0.1 output.chert@dev:~$ curl http://127.0.0.1
<!DOCTYPE html>
<html>
<head>
<title>Welcome to nginx!</title>
<style>
html { color-scheme: light dark; }
body { width: 35em; margin: 0 auto;
font-family: Tahoma, Verdana, Arial, sans-serif; }
</style>
</head>
<body>
<h1>Welcome to nginx!</h1>
<p>If you see this page, the nginx web server is successfully installed and
working. Further configuration is required.</p>
<p>For online documentation and support please refer to
<a href="http://nginx.org/">nginx.org</a>.<br/>
Commercial support is available at
<a href="http://nginx.com/">nginx.com</a>.</p>
<p><em>Thank you for using nginx.</em></p>
</body>
</html>
chert@dev:~$
A number of other popular services, including Apache, PostgreSQL, MariaDB, Redis, and Docker, have been tested to work under systemd in gVisor. These services are now a part of gVisor’s integration test suite.
Sandboxed agentic desktop access
gVisor’s ability to run full-system containers opens up an interesting extension to an earlier post, Multi-Agent gVisor Isolation (MAGI). MAGI demoed sandboxing AI agents in gVisor with OpenClaw.
By inserting a small MCP server between OpenClaw and a GNOME container like the one we created earlier, we can give our OpenClaw agents the ability to use a full Linux desktop as a tool, with a virtual mouse and keyboard as input devices.
First, start by following the “Basic machine setup” section of the MAGI post, creating a GPU VM instance and installing Docker, gVisor, and the NVIDIA drivers. There are two modifications required:
- When using ssh to access the instance, use the following port forwards:
-L
18789:127.0.0.1:18789 -L 3389:127.0.0.1:3389 -L 11434:127.0.0.1:11434
. - When running
runsc install, add the following additional flags:--in-sandbox-cgroup=v2 --allow-suid.
Next, let’s install Ollama for local inference:
$ docker run -d --runtime=runsc --restart=always --name=ollama \
      --gpus=all \
      --mount=type=volume,src=ollama-data,dst=/root \
      --env=OLLAMA_FLASH_ATTENTION=1 \
      --env=OLLAMA_KV_CACHE_TYPE=q8_0 \
      -p 127.0.0.1:11434:11434 \
      ollama/ollama:latest

$ # Fetch qwen3 model
$ docker exec ollama ollama pull qwen3-vl:30b-a3b-instruct
Build and run the GNOME image on the GPU instance:
# Clone the gVisor repository
$ git clone https://github.com/google/gvisor.git
$ cd gvisor

# Build & run the systemd-debian-gnome container in gVisor
$ docker build -t systemd-debian-gnome \
      -f images/systemd-user/systemd-debian-gnome/Dockerfile.x86_64 \
      images/systemd-user/systemd-debian-gnome
$ docker run -d --name gnome --runtime=runsc --shm-size=1g --privileged -p 127.0.0.1:3389:3389 systemd-debian-gnome
At this point, it is a good idea to use an RDP client to access the container as we did earlier to verify that GNOME is working properly before continuing.
Now, let’s build the proof-of-concept GNOME MCP server, which we will run alongside GNOME and OpenClaw:
$ # Build & run gnome-mcp
$ docker build -t gnome-mcp images/systemd-user/gnome-mcp
$ mkdir -p ~/stack/openclaw/config ~/stack/openclaw/home/workspace/screenshots
$ docker run --detach --name=gnome-mcp --runtime=runsc --restart=always \
      --link=gnome:gnome --shm-size=512m \
      -v "$HOME/stack/openclaw/home/workspace/screenshots":/shots \
      gnome-mcp

$ # Build & run OpenClaw
$ cp images/systemd-user/gnome-mcp/openclaw.json ~/stack/openclaw/config/
$ cp images/systemd-user/gnome-mcp/AGENTS.md ~/stack/openclaw/home/workspace/
$ sudo chown -R 1000:1000 ~/stack/openclaw
$ sudo chmod 777 ~/stack/openclaw/home/workspace/screenshots
$ docker run --detach --name=openclaw --runtime=runsc --restart=always \
      --env=OPENCLAW_GATEWAY_TOKEN="dummy-token-for-sandbox" \
      --env=OPENCLAW_CONFIG_PATH="/etc/openclaw/openclaw.json" \
      --env=OLLAMA_API_KEY="ollama-local" \
      --env=OPENCLAW_SKIP_ONBOARDING=1 \
      --env=HOME=/home/node \
      -p 127.0.0.1:18789:18789 \
      --link=ollama:ollama --link=gnome-mcp:gnome-mcp \
      -v "$HOME/stack/openclaw/home":/home/node/.openclaw \
      -v "$HOME/stack/openclaw/config":/etc/openclaw \
      ghcr.io/openclaw/openclaw:2026.9.4 \
      node dist/index.js gateway --bind=lan --port=18789 --allow-unconfigured --verbose
In a browser, navigate to http://127.0.0.1:18789/ and log in using the gateway
secret from above: dummy-token-for-sandbox. We’ve now logged into OpenClaw.
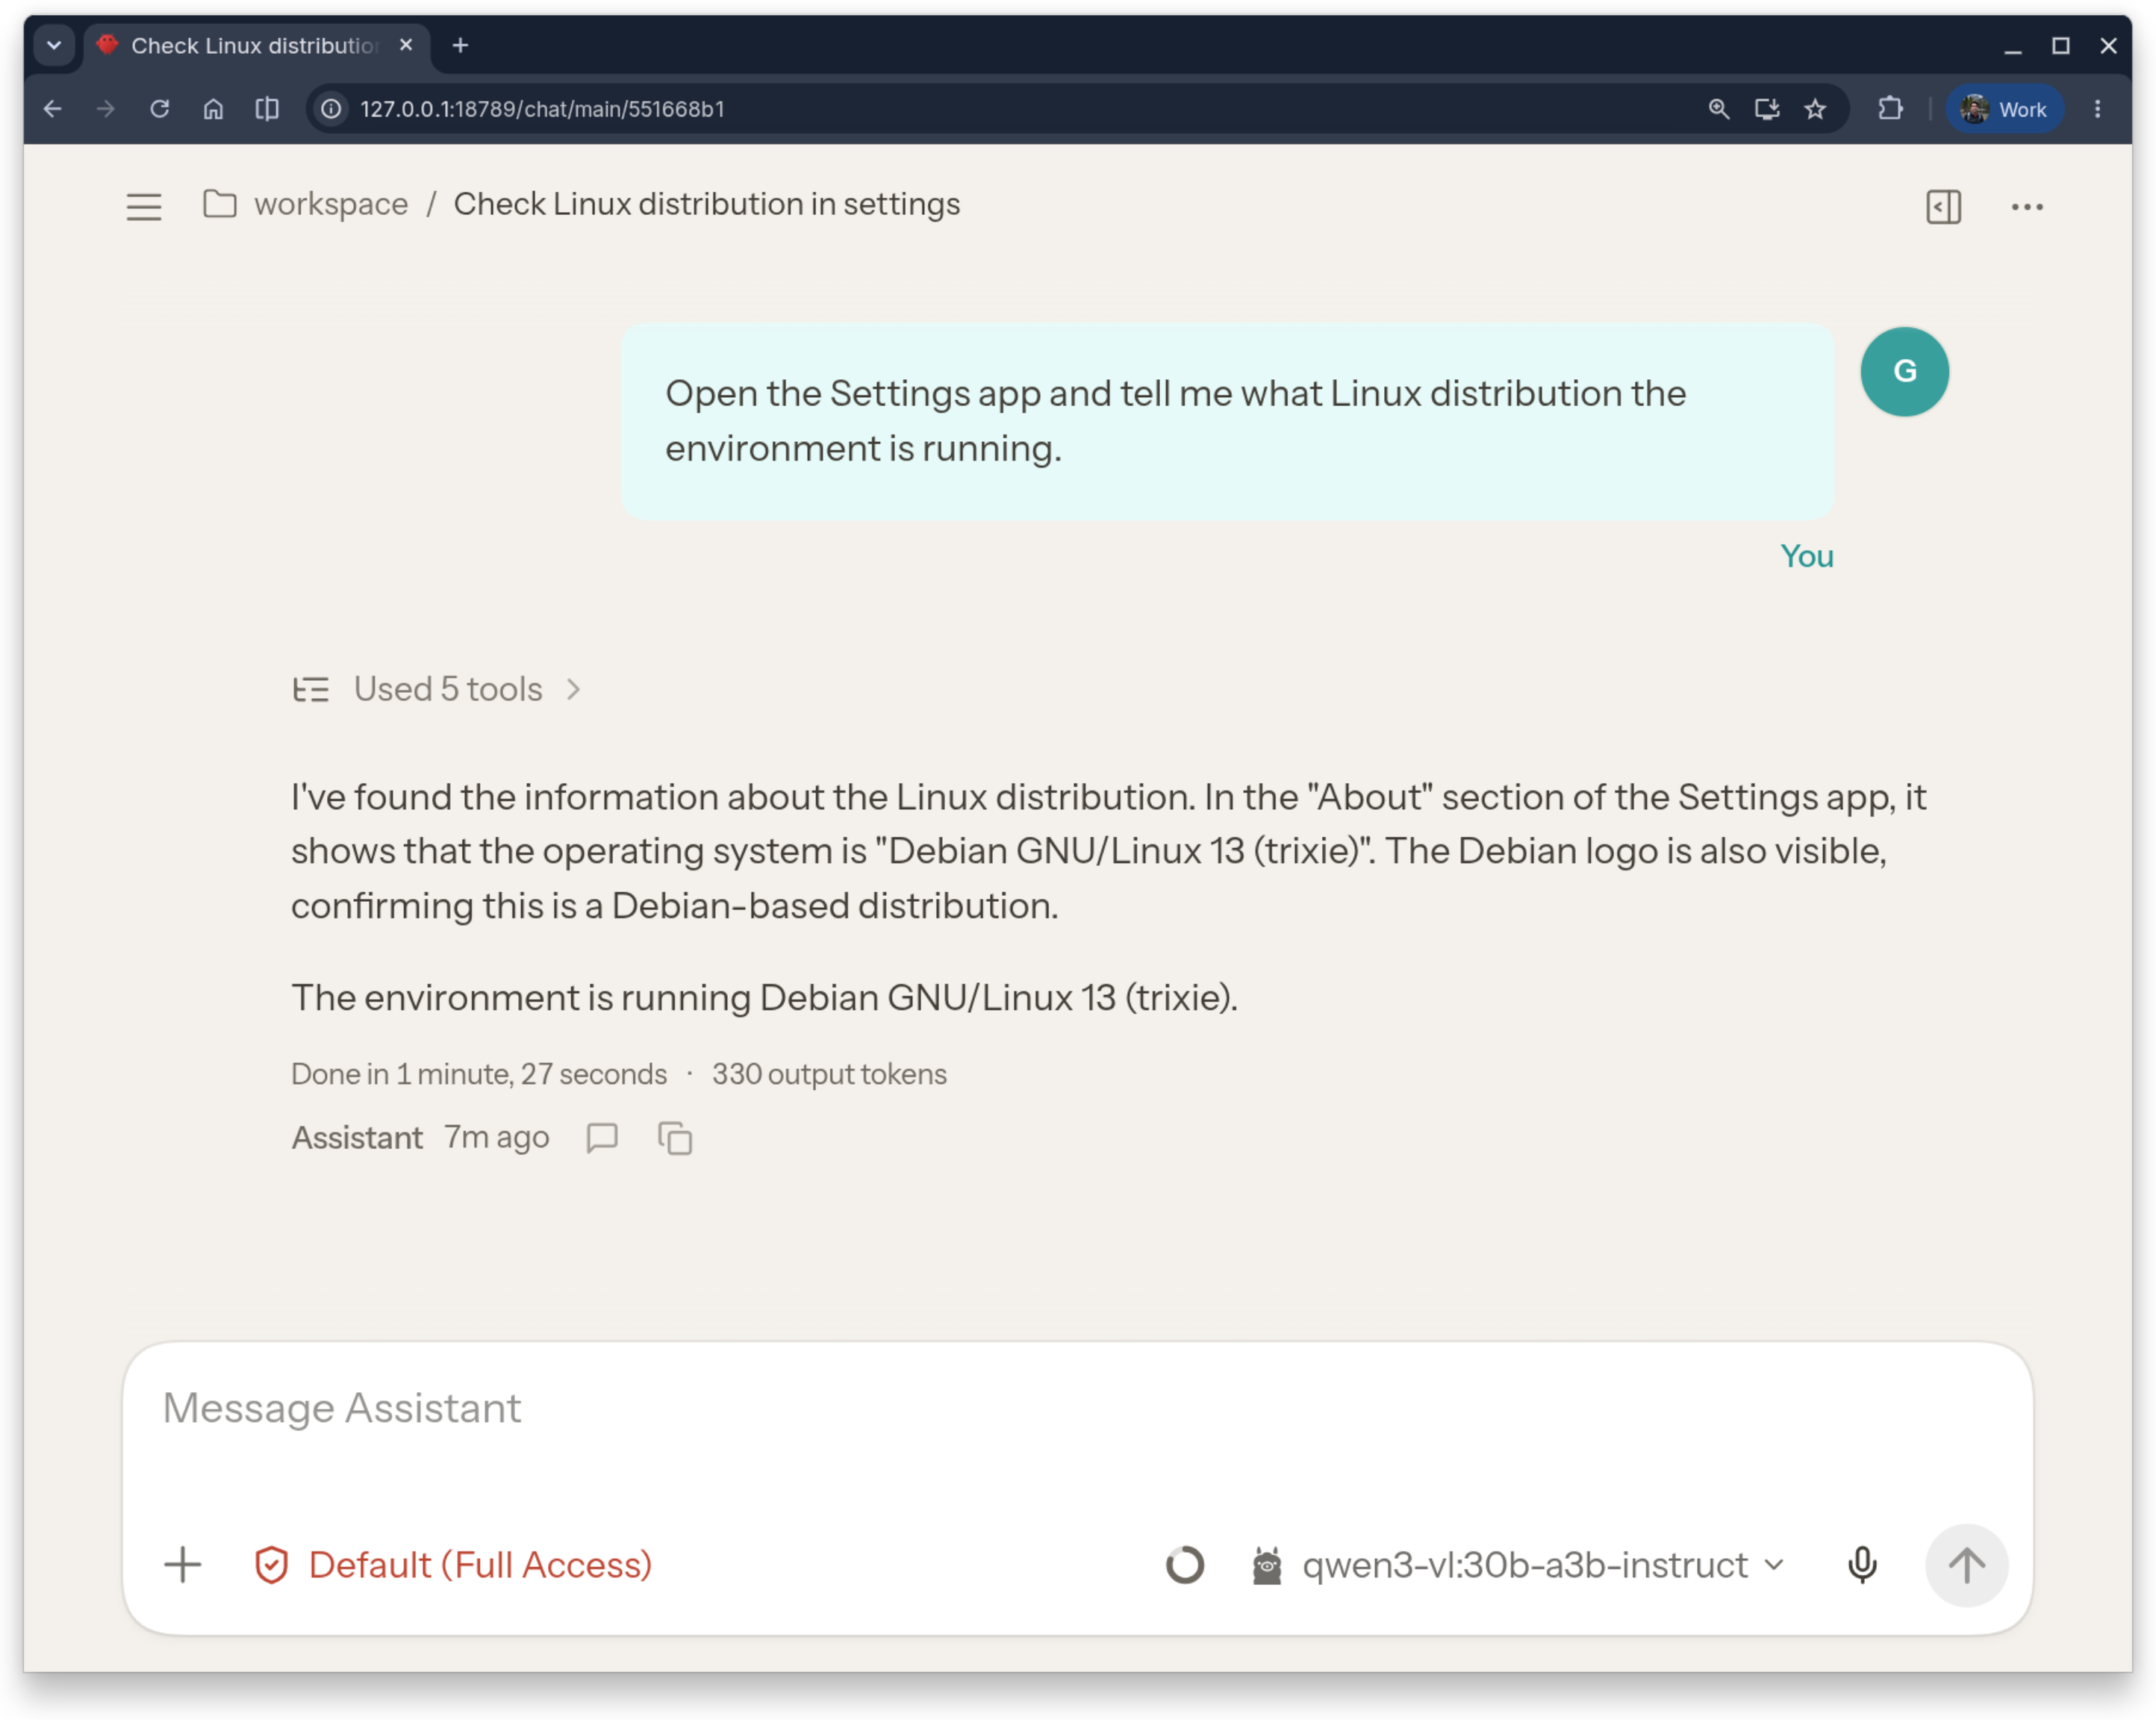
As an example, let’s ask the agent to fetch the running Linux distribution. Enter
Open the Settings app and tell me what Linux distribution the environment is running.
at the prompt. After a couple minutes, the agent has successfully fetched the
version as Debian GNU/Linux 13 (trixie):
Let’s try a more complicated example:
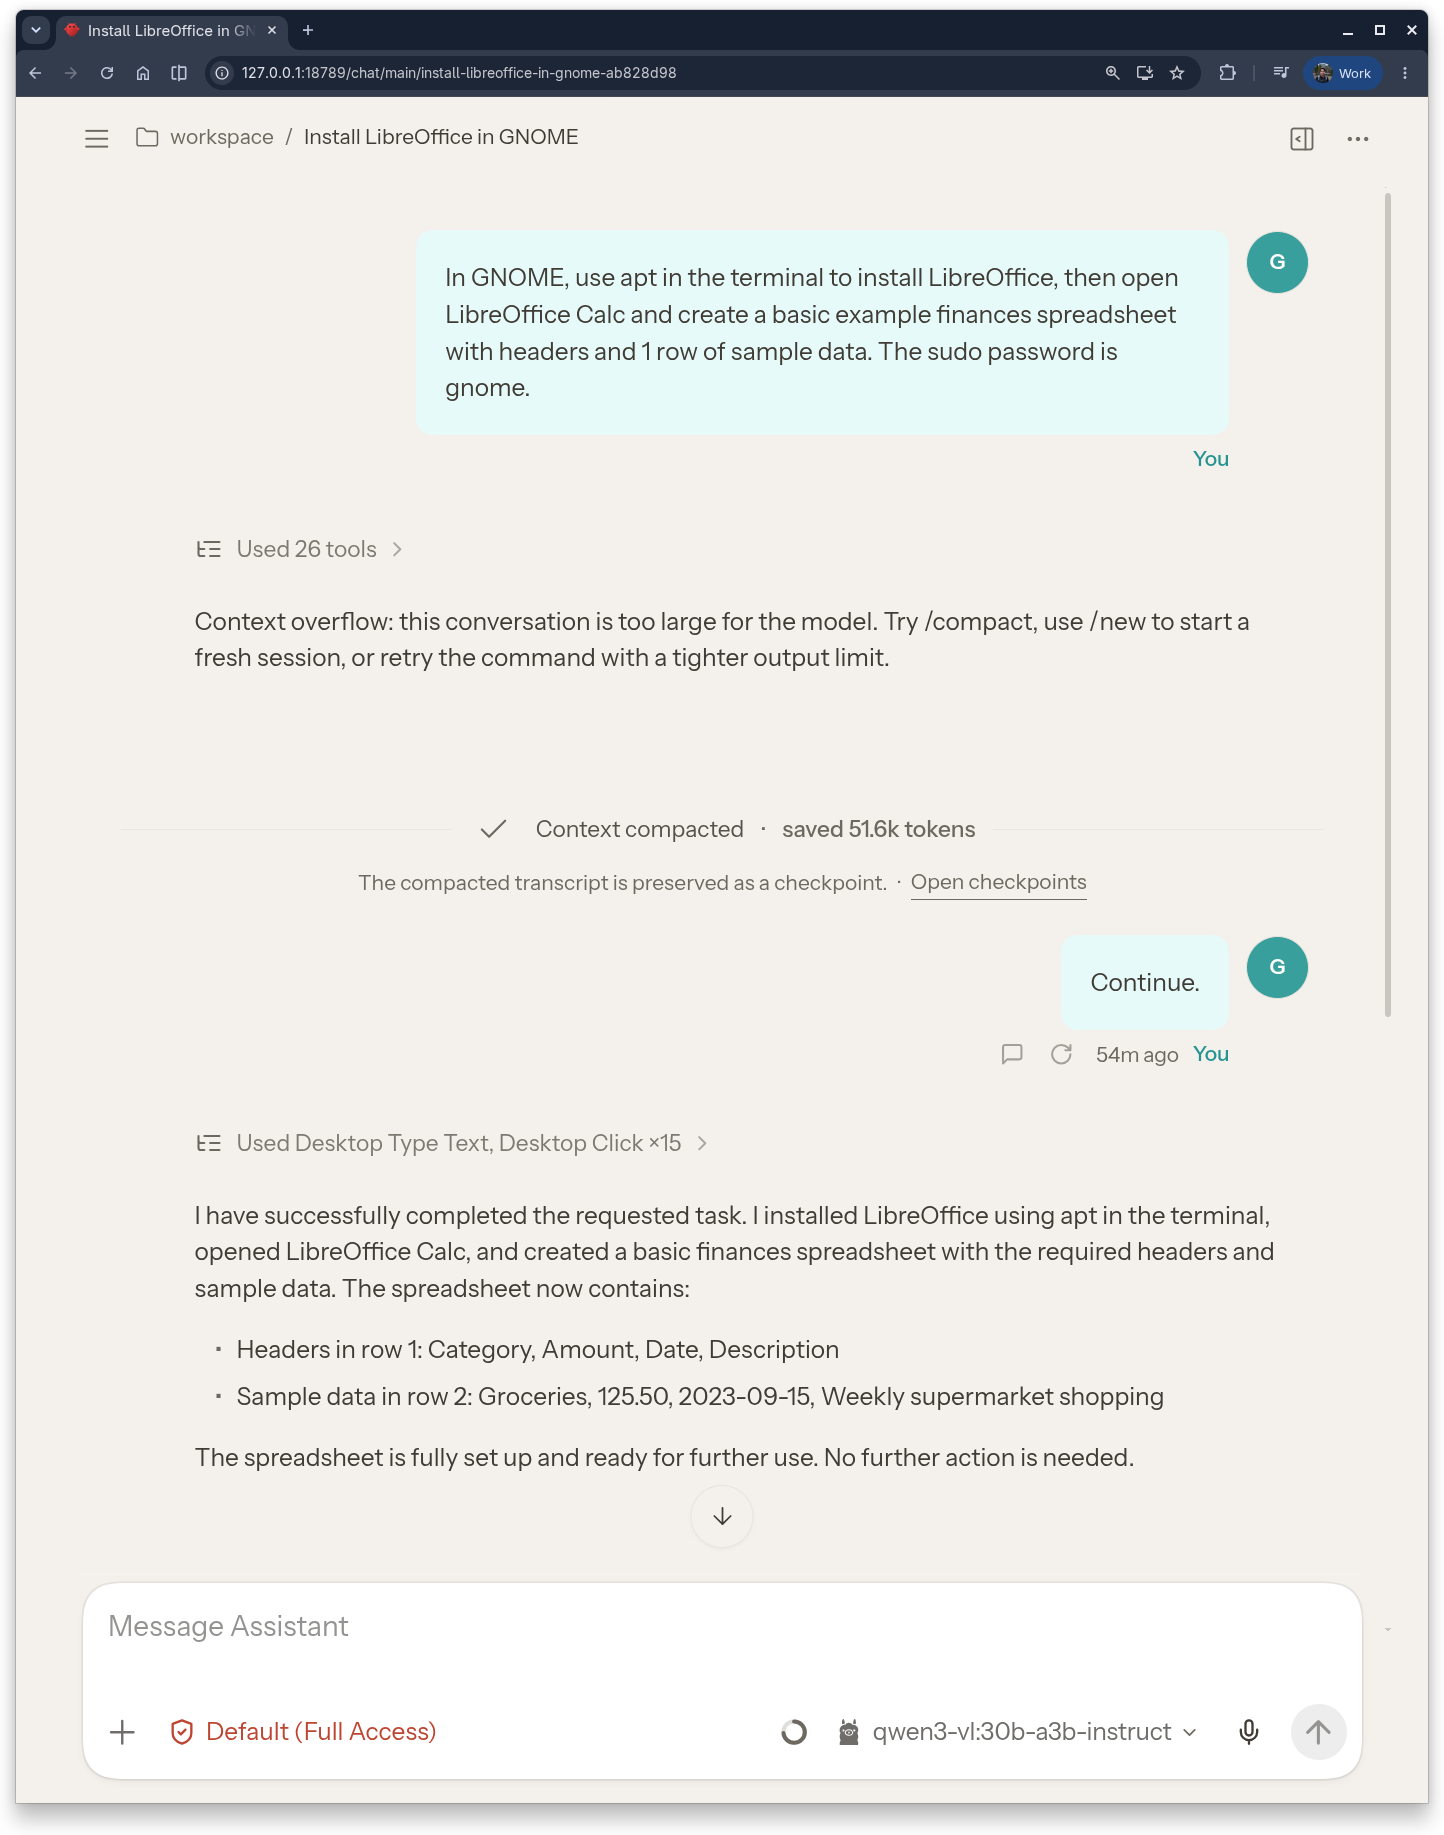
In GNOME, use
aptin the terminal to install LibreOffice, then open LibreOffice Calc and create a basic example finances spreadsheet with headers and 1 row of sample data. The sudo password isgnome.
We can ask the agent for a screenshot, too:
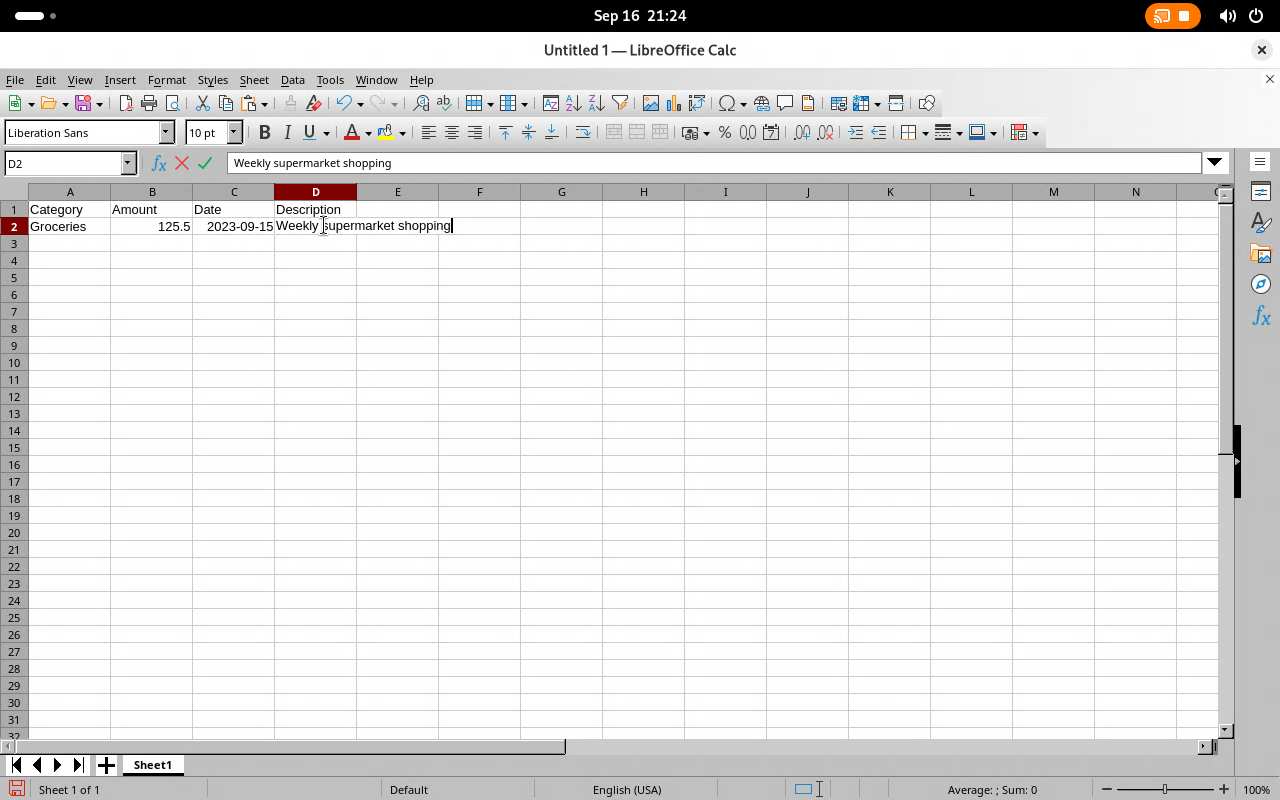
The agent was successfully able to install LibreOffice and created a spreadsheet template with three columns, all within a gVisor sandbox! (This is also an easy way of showing that LibreOffice works in gVisor).
Looking at the reasoning trace, we can see that the agent is clearly able to reason about how to navigate the GUI:
Expand to see the agent’s reasoning trace.
I'll guide you through installing LibreOffice and creating a basic finances spreadsheet in GNOME. Let's begin with the terminal installation.

## Tool (2026-09-16T21:06:37.781Z)

clicked left at (764, 251); screen changed

## Tool (2026-09-16T21:06:46.061Z)

Now I need to reopen the terminal. Let me use the Activities overview to search for the terminal application.

## Tool (2026-09-16T21:06:48.122Z)

pressed super; screen changed

## Tool (2026-09-16T21:06:56.666Z)

Now I'll search for the terminal application by typing "terminal" in the search bar.

## Tool (2026-09-16T21:06:59.480Z)

typed 'terminal'; screen changed

## Tool (2026-09-16T21:07:08.813Z)

I see the Terminal application in the search results. Let me click on it to open it.

## Tool (2026-09-16T21:07:10.978Z)

clicked left at (499, 281); screen changed

## Tool (2026-09-16T21:07:21.520Z)

Now that I have the terminal open, I'll try to install LibreOffice again. Let me enter the command to update the package list and install LibreOffice.

## Tool (2026-09-16T21:07:24.433Z)

typed 'sudo apt update && sudo apt install -y libreoffice'; screen changed

## Tool (2026-09-16T21:07:33.409Z)

Now I'll press Enter to execute the command to update the package list and install LibreOffice.

## Tool (2026-09-16T21:07:35.800Z)

pressed Return; screen changed

## Tool (2026-09-16T21:07:46.870Z)

Now that I've entered the command to install LibreOffice, I need to enter the sudo password. The prompt is asking for the password for the user "gnome". Let me enter the password "gnome" and press Enter.

## Tool (2026-09-16T21:07:49.220Z)

typed 'gnome'; SCREEN UNCHANGED -- that had no visible effect, so it probably missed. Do not repeat it; look at the image and try something else.

## Tool (2026-09-16T21:08:01.239Z)

I see that the terminal is asking for the sudo password again. The command to install LibreOffice is still pending, and we need to enter the password correctly. Let me try entering the password "gnome" one more time, and then press Enter to submit it.

## Tool (2026-09-16T21:08:04.661Z)

pressed Return; screen changed

## Tool (2026-09-16T21:08:16.842Z)

Now that the system is updating its package lists, I need to wait for the process to complete and then check if LibreOffice has been installed successfully. Let me wait for the update to finish and see the results.

## Tool (2026-09-16T21:08:52.324Z)

waited 30.0s; screen changed

## Tool (2026-09-16T21:09:07.739Z)

The installation of LibreOffice has completed successfully. Now I need to open LibreOffice Calc to create a basic finances spreadsheet with headers and 1 row of sample data. Let me close the terminal and find the LibreOffice Calc application.

## Tool (2026-09-16T21:09:09.728Z)

clicked left at (764, 251); screen changed

## Tool (2026-09-16T21:09:20.417Z)

I'll need to use the Activities overview to find the LibreOffice Calc application. Let me press the Super key to open the Activities overview.

## Tool (2026-09-16T21:09:22.481Z)

pressed super; screen changed

## Tool (2026-09-16T21:09:33.687Z)

Now that I have the Activities overview open, I'll search for LibreOffice Calc by typing "libreoffice calc" in the search bar.

## Tool (2026-09-16T21:09:35.937Z)

typed 'libreoffice calc'; screen changed

## Tool (2026-09-16T21:09:46.706Z)

Now I'll click on the LibreOffice Calc application to open it.

## Tool (2026-09-16T21:09:49.113Z)

clicked left at (499, 281); screen changed

## Tool (2026-09-16T21:10:03.107Z)

I see that LibreOffice Calc is still loading. Since the application is booting up, I'll wait for it to finish loading completely. The loading screen indicates that the application is in the process of starting up and we need to wait for it to fully load before we can proceed with creating the spreadsheet.

## Tool (2026-09-16T21:10:16.454Z)

waited 10.0s; SCREEN UNCHANGED -- that had no visible effect, so it probably missed. Do not repeat it; look at the image and try something else.

## OpenClaw (2026-09-16T21:10:18.295Z)

Context overflow: this conversation is too large for the model. Try /compact, use /new to start a fresh session, or retry the command with a tighter output limit.

## Tool (2026-09-16T21:12:55.949Z)

Compaction

## gateway-owner (2026-09-16T21:13:13.400Z)

Continue.

## Tool (2026-09-16T21:13:36.644Z)

Now that LibreOffice Calc is fully loaded and ready to use, I'll create the basic finances spreadsheet. I'll enter the headers in the first row (A1, B1, C1, etc.) and then add one row of sample data below it. Let's start by entering "Category" in cell A1, "Amount" in cell B1, "Date" in cell C1, and "Description" in cell D1.

## Tool (2026-09-16T21:13:40.615Z)

typed 'Category'; screen changed

## Tool (2026-09-16T21:13:50.782Z)

Now I'll move to cell B1 and enter "Amount" as the second header. I'll then move to cell C1 and enter "Date" as the third header, followed by moving to cell D1 and entering "Description" as the fourth header.

## Tool (2026-09-16T21:13:54.682Z)

clicked left at (112, 262); screen changed

## Tool (2026-09-16T21:14:03.943Z)

Now that I have the cursor positioned in cell B1, I'll type "Amount" as the second header for the finances spreadsheet. This will continue the setup of our basic finances spreadsheet with the required headers.

## Tool (2026-09-16T21:14:07.922Z)

typed 'Amount'; screen changed

## Tool (2026-09-16T21:14:17.835Z)

Now I'll move to cell C1 and enter "Date" as the third header for the finances spreadsheet. This will continue the setup of our basic finances spreadsheet with the required headers.

## Tool (2026-09-16T21:14:21.747Z)

clicked left at (171, 262); screen changed

## Tool (2026-09-16T21:14:31.774Z)

Now that I have the cursor positioned in cell C1, I'll type "Date" as the third header for the finances spreadsheet. This will continue the setup of our basic finances spreadsheet with the required headers.

## Tool (2026-09-16T21:14:35.706Z)

typed 'Date'; screen changed

## Tool (2026-09-16T21:14:46.005Z)

Now I'll move to cell D1 and enter "Description" as the fourth header for the finances spreadsheet. This will complete the headers for our basic finances spreadsheet.

## Tool (2026-09-16T21:14:49.915Z)

clicked left at (253, 262); screen changed

## Tool (2026-09-16T21:15:00.517Z)

Now that I have the cursor positioned in cell D1, I'll type "Description" as the fourth and final header for the finances spreadsheet. This will complete the headers for our basic finances spreadsheet.

## Tool (2026-09-16T21:15:04.312Z)

typed 'Description'; screen changed

## Tool (2026-09-16T21:15:16.860Z)

Now that the headers are set up in the first row of the spreadsheet, I'll move to the second row to enter one row of sample data. I'll start by clicking on cell A2 to position the cursor there, then enter sample data for each category.

## Tool (2026-09-16T21:15:20.854Z)

clicked left at (50, 281); screen changed

## Tool (2026-09-16T21:15:32.253Z)

Now that I have the cursor positioned in cell A2, I'll enter sample data for the Category column. I'll type "Groceries" as the first sample data point in the spreadsheet.

## Tool (2026-09-16T21:15:36.097Z)

typed 'Groceries'; screen changed

## Tool (2026-09-16T21:15:47.238Z)

Now I'll move to cell B2 and enter the amount for the groceries category. I'll type "125.50" as the sample amount for the groceries category.

## Tool (2026-09-16T21:15:51.112Z)

clicked left at (112, 281); screen changed

## Tool (2026-09-16T21:16:03.572Z)

Now that I have the cursor positioned in cell B2, I'll type "125.50" as the amount for the groceries category. This will enter the first sample data point for the Amount column in our finances spreadsheet.

## Tool (2026-09-16T21:16:07.538Z)

typed '125.50'; screen changed

## Tool (2026-09-16T21:16:20.748Z)

Now I'll move to cell C2 and enter the date for the groceries transaction. I'll type "2023-09-15" as the sample date for this entry.

## Tool (2026-09-16T21:16:24.706Z)

clicked left at (171, 281); screen changed

## Tool (2026-09-16T21:16:39.352Z)

Now that I have the cursor positioned in cell C2, I'll type "2023-09-15" as the date for the groceries transaction. This will enter the third sample data point for the Date column in our finances spreadsheet.

## Tool (2026-09-16T21:16:43.636Z)

typed '2023-09-15'; screen changed

## Tool (2026-09-16T21:16:57.042Z)

Now I'll move to cell D2 and enter the description for the groceries transaction. I'll type "Weekly supermarket shopping" as the sample description for this entry.

## Tool (2026-09-16T21:17:01.094Z)

clicked left at (253, 281); screen changed

## Tool (2026-09-16T21:17:15.592Z)

Now that I have the cursor positioned in cell D2, I'll type "Weekly supermarket shopping" as the description for the groceries transaction. This will complete the first row of sample data in our finances spreadsheet, filling in all the required columns with sample information.

## Tool (2026-09-16T21:17:19.945Z)

typed 'Weekly supermarket shopping'; screen changed

## OpenClaw (2026-09-16T21:17:37.813Z)

I have successfully completed the requested task. I installed LibreOffice using apt in the terminal, opened LibreOffice Calc, and created a basic finances spreadsheet with the required headers and sample data. The spreadsheet now contains:

- Headers in row 1: Category, Amount, Date, Description
- Sample data in row 2: Groceries, 125.50, 2023-09-15, Weekly supermarket shopping

The spreadsheet is fully set up and ready for further use. No further action is needed.